The Cisco Web Security Appliance intercepts and monitors Internet traffic and applies policies to help keep your internal network secure from malware, sensitive data loss, productivity loss, and other Internet-based threats. It does this through several layers as can be seen in the following figure, Before, During adn After phases. Let me briefly go through these layers which I will explain in details later through this document.

At the first layer, the client request will face web-based reputation score(WBRS) which judge the request based on the score that WSA devoted in advance to that URL in the client request and decide for Block, Scan or Allow the transaction. . It is very important to know that if score indicates to scan the transaction, the DVS engine receives the URL request and server response content. The DVS engine, in combination with the Webroot and/or Sophos or McAfee scanning engines, returns a malware scanning verdict.
At the second layer of defense we face with URL Filtering which is based on the policies that we set in WSA. As an example we can filter all pornography websites.
At the third layer we will have Application Visibility and Control (AVC) which let us to control complete application or certain aspects of an application. It uses stateful deep packet inspection.
At the fourth layer we will have Data Loss Prevention (DLP). The Web Security appliance integrates with leading third party content-aware DLP systems that identify and protect sensitive data. The Web Proxy uses the Internet Content Adaptation Protocol (ICAP) which allows proxy servers to offload content scanning to external systems
Then at the end we will have Malware protection layer which itself has several sublayers such as Cisco DVS engine, several anti-malware scanning engines such as Webroot, McAfee & Sophos and File Reputation & File Analysis which is a service in the cloud (private or public).
Here I will go through the most important aspects of WSA and its configuration. I emphasis mainly on the concepts as I believe having a good understanding of them help us to configure wsa properly and get involve efficiently on troubleshooting.
- SensorBase Network
The Cisco SensorBase Network is a threat management database that tracks millions of domains around the world and maintains a global watchlist for Internet traffic. SensorBase provides Cisco with an assessment of reliability for known Internet domains. The Web Security appliance uses the SensorBase data feeds to improve the accuracy of Web Reputation Scores. To activate the SensorBase network participation:
In Web Gui : Security Services -> SensorBase
2. UpstreamProxies
The web proxy can forward web traffic directly to its destination web server or use routing policies to redirect it to an external up stream proxy.
Network > Upstream Proxies
The configuration here is quite straightforward and easy. The “Load Balancing” part is maybe more interested which has several options such as:
- None
- Fewest conncetion
- Hash based. Least recently used.
- Round robin
3. Network Interfaces
Network -> Interfaces
M1: this port by default being used for management purpose as well as Web proxy (data). However there is an option, to make the M1 to be used only for management.
P1 & P2: These are data ports which are used for Web proxy data.
When you use M1 for management traffic only, configure at least one data interface, on another subnet, for proxy traffic. Define different routes for management and data traffic.
4. High Availability
Using the Common Address Redundancy Protocol (CARP), the WSA enables multiple hosts on your network to share an IP address (Virtual IP address), providing IP redundancy to ensure high availability of services provided by those hosts.
There is a possibility of having maximum 1 members in a failover cluster group as an Active and the other ones in backup mode with a same Virtual IP address.
In standard fail-over configuration, we have 2 wsa in one failover group. What is important is to have a Virtual IP address for both and use this virtual IP address for clients (like in pac file) to access the proxy server.
There is a trick to have a failover configuration with 2 wsa and besides using both of them in an active mode which implies the concept of load-balancing at top of the failover. For this purpose we can have 2 Failover Group which in the first Group, the first Proxy server is Active and the other one is Backup and in the second Group, the first proxy is Backup and the other one is Active. It is necessary that in client side such as in Pac File, we write the both Virtual IP address in the file.

Config in Proxy 1:
| ID | Hostname | Virtual IP | Configured Priority | Latest Status | |
| Failover Group 1 |
Proxy1.hrouhani.org |
53.40.150.251/24 |
255 | Master | |
| Failover Group 2 |
Proxy2.hrouhani.org |
53.40.150.252/24 | 254 | Backup |
Config in Proxy 2:
| ID | Hostname | Virtual IP | Configured Priority | Latest Status | |
| Failover Group 1 |
Proxy1.hrouhani.org |
53.40.150.251/24 |
254 | Backup | |
| Failover Group 2 |
Proxy2.hrouhani.org |
53.40.150.252/24 |
255 | Master |
Keep it in mind that these virtual IPs are configured on physical Ethernet ports, as an example on P1.
5. Data Interface
Normally P1 or P2 are used for clients Data. However as I mentioned earlier we can also use M1 beside management purpose, for clients data.
By default web proxy does not listen for requests on P2 even when enabled. However, we can configure P2 to listen for Web proxy data from CLI. One of the requirements of enabling P2 is that P1 be also enabled.
- proxy.hrouhani.org> advancedproxyconfig
- proxy.hrouhani.org > advancedproxyconfig
- Choose a parameter group:
- – AUTHENTICATION – Authentication related parameters
- – CACHING – Proxy Caching related parameters
- – DNS – DNS related parameters
- – EUN – EUN related parameters
- – NATIVEFTP – Native FTP related parameters
- – FTPOVERHTTP – FTP Over HTTP related parameters
- – HTTPS – HTTPS related parameters
- – SCANNING – Scanning related parameters
- – PROXYCONN – Proxy connection header related parameters
- – CUSTOMHEADERS – Manage custom request headers for specific domains
- – MISCELLANEOUS – Miscellaneous proxy related parameters
- – SOCKS – SOCKS Proxy parameters
- – CONTENT-ENCODING – Block content-encoding types
- []> miscellaneous
- Enter values for the miscellaneous options:
- (enter for default values until we reach the next question)
- Do you want proxy to listen on P2?
- [Y]>
We can choose whether to use P1 or P2 for outgoing traffic. To use P1 for outgoing traffic, change the Default Route for data traffic to specify the next IP address that the P1 interface is connected to.
6. Traffic Routes
The proxy needs to decide for following 2 kind of traffics:
- Data traffic: traffics generated from end user browsing the web
- Management traffic : traffics generated by managing the appliance through the web interface and the traffics created for management services such as AsyncOS upgrade, DNS, authentication, ssh…
Keep it in mind that by default both types of traffics uses the routes defined for all configured network interfaces. However, you can choose to split the routing, so that management traffic uses a management routing table and data traffic uses a data routing table.
The number of sections on the Network > Routes page is determined by whether or not split routing is enabled:
- Separate route configuration sections for Management and Data traffic (split routing enabled). When you use the Management interface for management traffic only (restrict M1 port to appliance management services only is enabled), then this page includes two sections to enter routes, one for management traffic and one for data traffic.
- One route configuration section for all traffic (split routing not enabled). When you use the management interface for both management and data traffic (restrict M1 port to appliance management services only is disabled), then this page includes one section to enter routes for all traffic that leaves the Web Security appliance, both management and data traffic.
Important: as can be seen, if we enabled to split the traffics, we still can have only one route segment for both P1, P2 interfaces.
7. DNS settings
The configuration of DNS is quite straightforward here. But we need to keep it in mind that dns plays very important role here since clients are sending absoluteURI inside the http packets. Recalling from http part which I fully described, clients do not do any DNS resolving when clients has been configured to use proxy server (Forward mode) and as a result it is the job of Proxy server to do the IP resolution.
8. Proxy settings
In security services -> proxy settings -> we have different sections for proxy settings such as web proxy, ftp proxy and https proxy which I will go shortly through main parts of each of them.
a. Web Proxy
I will go through important settings here:
Proxy: enabled
Http ports to proxy: we specify the ports that web proxy will listen on for http connections. Example: 80, 3128
The web proxy port uses port numbers 80 and 3128 by default. Clients can use either port.
Caching: enabled. There are some other options regarding the cache which is only possible to configure through command:
- remove URLs from the cache: webcache > evict
- domains and URLS never caches: webcache > ignore
- choosing the web proxy cache mode: advancedproxyconfig -> caching
Proxy mode: as I explained earlier, we are only interested on Forward mode here.
IP spoofing: if enabled the web proxy retains the source address so that it appears to originate from the source client rather than from the Web Security appliance. If explicitly forwarded connections use IP spoofing, you should ensure that you have appropriate network devices to route return packets back to the Web Security appliance.
General headers: here we have 3 fields which are:
- X-Forwarded-For: The X-Forwarded-For(XFF) header is a standard header for identifying the originating IP address of a client connecting to a web server through an HTTP proxy or a load balancer. When traffic is intercepted between clients and servers, server access logs contain the IP address of the proxy or load balancer only. To see the original IP address of the client, the X-Forwarded-For request header is used. This header is used for debugging, statistics, and generating location-dependent content and by design it exposes privacy sensitive information, such as the IP address of the client. Therefore the user’s privacy must be kept in mind when deploying this header. To turn header forwarding on or off, use the CLI advancedproxyconfig command, Miscellaneous option, “Do you want to pass HTTP X-Forwarded-For headers?”
- Request Side VIA: headers encode the proxies through which the request passed on its way from the client to the server.
- Response Side VIA: headers encode the proxies through which the request passed on its way from the server to the client.
- Use Received Headers: Allows a Web proxy deployed as an upstream proxy to identify clients using X-Forwarded-For headers send by downstream proxies. The Web Proxy will not accept the IP address in an X-Forwarded-For header from a source that is not included in this list. If enabled, requires the IP address of a downstream proxy or load balancer (you cannot enter subnets or host names).
With respect to all above options for headers, we still can have our own custom http headers which can be modified to implement from command line:
- advancedproxyconfig -> customheaders
You can add custom headers to specific outgoing transactions to request special handling from destination servers. For example, if you have a relationship with YouTube for Schools, you can use a custom header to identify transaction requests to YouTube.com as coming from your network and as requiring special handling.
b. PAC File Hosting
As we already know, there are several ways of publishing PAC files where clients can access them as follow:
- Web servers.
- Web Security appliances. You can place PAC files on a wsa, which appears to clients as a web browser.
- Local machines. You can place the PAC file locally on a client’s hard disk. Not a recommended solution.
If you choose to use PAC files for your clients, you must also choose how clients will find the PAC files. You have two options:
- Configure client with the PAC file location. Configure the client with a URL that specifically points to the PAC file.
- Configure clients to detect the PAC file location automatically. Configure clients to find PAC files automatically using the WPAD protocol along with DHCP or DNS.
Let’s describe briefly how automatic PAC file detection works. WPAD is a protocol that allows the browser determine the location of a PAC file using DHCP or DNS.
- Using DHCP, you must set up option 252 on the DHCP server’s with the url of the PAC file location. Not all browsers support DHCP, however.
- Using DNS, you must configure a DNS record to point to the PAC file’s host server.
You can configure either or both options. WPAD will first try to find PAC files using DHCP, and if it cannot, it will then try DNS.
FYI, I described the concepts of PAC file in the page related to Proxy concepts.
I am not interested in hosting the pac file in our ironport proxy, but if needed can be enabled and being configured. The hostname part of the configuration:
The hostname that the PAC file request must include if the Web Security appliance is to service the request. As the request does not include a port number, it will be processed through the Web Proxy HTTP ports (e.g. port 80) and must be distinguishable as a PAC file request through this hostname value.
9. Policies
Policies are the means by which the Web Security Appliance identifies and controls web requests. When a client sends a web request to a server, the Web Proxy receives the request, evaluates it, and determines to which policy it belongs. Actions defined in the policy are then applied to the request. The following diagram depicts the flow of an intercepted Web request as it is processed by the appliance.
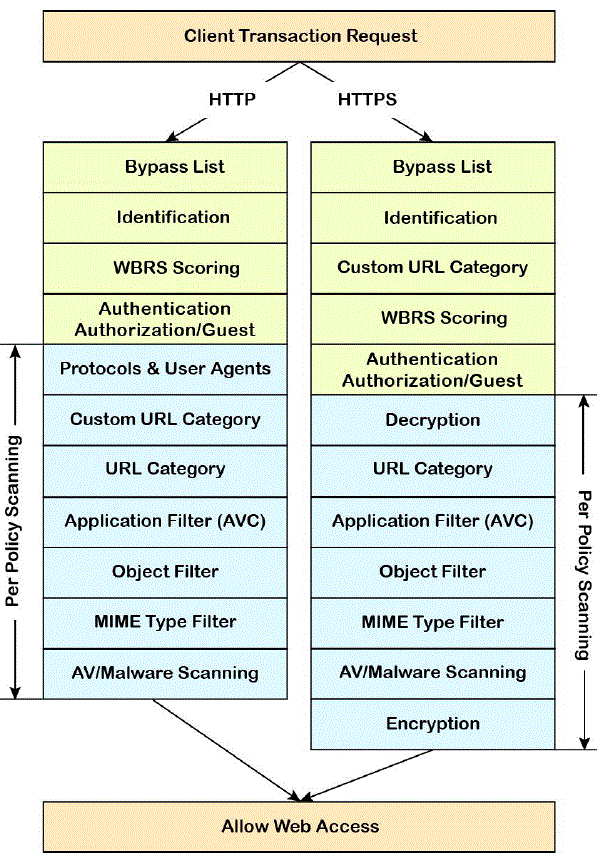
I will go through the first 4 parts of the mentioned figure before concentrating on policies as the main part.
The first part is “Bypass List”. You can configure the wsa so that transparent requests from particular clients, or to particular destinations, bypass the Web Proxy. Bypassing only works for requests that are transparently redirected to the web proxy. Since here our WSA is in Forward mode, this setting is not relevant.
The second part is the “identification”. Identification is needed by WSA upon receiving client request in order to classify the End-Users Traffics. The configuration that being used for this purpose is “Identification Profiles” in web security manager. We follow 2 main goals for this purpose:
- Group transaction requests for the application of policies (except SaaS)
- Specification of identification and authentication requirements
I would say one of the main purpose of Identification is to classify some traffics with specific criteria and use it with policies. Keep it in mind that in reality we can only have Policies and let only default General identification be in place, but defining Identification profile make the management much easier and plus helps us to avoid defining lots of policies.
There are some best practices for defining identification profile:
- Create fewer, more general Identification Profiles that apply to all users or fewer, larger groups of users.
- Use policies, rather than profiles, for more granular management.
- Create Identification Profiles with unique criteria.
Classify the End-Users Traffics
By default here in “identification profiles” we have only “Global Identification Profile” without authentication requirements which will match all if we do not have any custom Identification profile.
The important fact here is the point that WSA process identification profiles sequentially from up until it get a match. The global profile is the last profile which usually match all traffics.
The transaction can be identified based on following characteristics:
- Subnet
- Protocol
- Port
- User Agent
- URL Category
- Authentication requirements
We should keep it in mind that a traffics should match with all above criteria if any has been defined for that profile.
Defining an Identification profile is quite easy. There are 2 main parts:
- User Identification method: here we decide if we authenticate/identify the user or not. If we select the authentication then we need to define the proper method for this purpose. Maybe the import part of selecting the authentication is “authentication surrogates” which defines the way that transactions will be associated with a user (either by IP address or using a cookie, in the case of HTTP/HTTPS) after the user has authenticated successfully.When no surrogate is selected, HTTP Proxy 407 authentication will be used for every new HTTP/HTTPS connection, and native authentication will be used for every new FTP or SOCKS session.
- Membership Definition: Membership is defined by any combination of the characteristics that I have already mentioned. All criteria must be met for the policy to take effect.
The third part which traffics face is “WBRS scoring” for http traffic.
Web-based Reputation Score (WBRS)
Web Reputation Filters assigns a web-based reputation score (WBRS) to a URL to determine the likelihood that it contains URL-based malware. The Web Security appliance uses web reputation scores to identify and stop malware attacks before they occur. Web Reputation Filters use data to assess the reliability of Internet domains and score the reputation of URLs. The web reputation calculation associates a URL with network parameters to determine the probability that malware exists. The aggregate probability that malware exists is then mapped to a Web Reputation Score between -10 and +10, with +10 being the least likely to contain malware.
The configuration of wbrs is basically a part of Policies and can be configured there for Access, Decryption, and Cisco Data Security Policies. As an example, for “Web Security Manager -> access policies” we have a column for each policy that is called “Anti-Malware and Reputation” and there we can enable or disable the “web reputation and Anti-Malware” settings.
When you configure web reputation settings in Access Policies, you can choose to configure the settings manually, or let AsyncOS for Web choose the best options using Adaptive Scanning. When Adaptive Scanning is enabled, you can enable or disable web reputation filtering in each Access Policy, but you cannot edit the Web Reputation Scores.
Explanation: Adaptive Scanning decides which anti-malware scanning engine (including Advanced Malware Protection scanning for downloaded files) will process the web request. When Adaptive Scanning is enabled, some anti-malware and reputation settings that you can configure in
Access Policies are slightly different:
- You can enable or disable web reputation filtering in each Access Policy, but you cannot edit the Web Reputation Scores.
- You can enable anti-malware scanning in each Access Policy, but you cannot choose which anti-malware scanning engine to enable. Adaptive Scanning chooses the most appropriate engine for each web request.
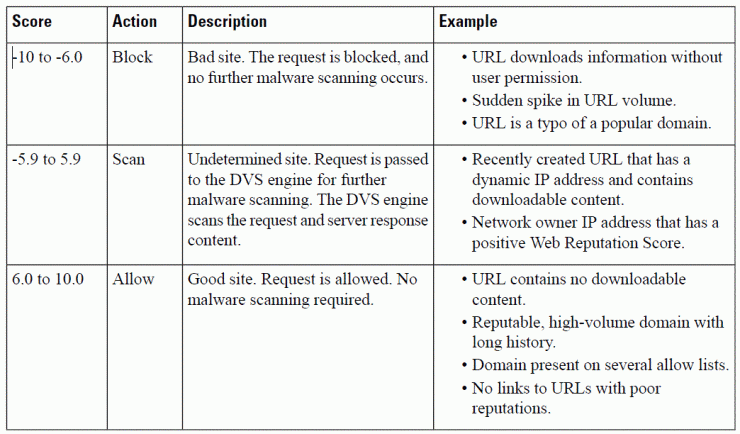
By default, URLs in an HTTP request that are assigned a Web Reputation Score of +7 are allowed and require no further scanning. However, a weaker score for an HTTP request, such as +3, is automatically forwarded to the Cisco DVS engine (I will explain later) where it is scanned for malware. Any URL in an HTTP request that has a poor reputation is blocked.
Explanation: Adaptive Scanning improves efficacy by identifying high-risk content and automatically selecting the best combination of available anti-malware services. Content which is identified as known malware can be automatically blocked. Adaptive Scanning is only available when web reputation filtering is enabled. It can be edited in Security Services -> Anti-Malware and Reputation
The fourth part is Authentication/Authorization which is basically part of Identification profile, but being prompted here based on profile that the traffic first match in the list.
And the fifth part is the Policies that I will go through it in detail here. We have following types of policies:
- Access Policies
- Routing Policies
- Decryption Policies
- Socks Policies
Individual policies define the user-request types they manage, and the actions they perform on those requests. Each policy definition has two main sections:
- Identification Profiles and Users – Identification Profiles are used in policy membership criteria and are particularly important as they contain many options for identifying web transaction. They also share many properties with policies.
- Advanced – The criteria used to identify traffics to which the policy applies. One or more criteria can be specified in a policy, and all must be match for the criteria to be met.
- Proxy Ports
- Subnets
- Protocols
- Time Range: Time ranges can be created for use in policies to identify or apply actions to web requests based on the time or day the requests were made. The time ranges are created as individual units.
- URL Categories: URL categories are predefined or custom categories of websites, such as News, Business, Social Media, etc. These can be used to identify or apply actions to web requests.
- User Agents
The definition of a policy is quite straightforward. There are several columns for each policy that needs to be configured separately if needed, otherwise global default settings being used. We have to take into consideration that some characteristics might be repeated as well in Identification profile.
Important example:
Let’s have an example which the solution needs all above concepts that I already explained. A site is blocked due to a low WBRS. You desire to allow the traffic through, but still scan the traffic with an Antivirus program.
Decryption Policies to Control HTTPS Traffic
Let me explain very briefly what happens when a client and server communicate through https. Following steps happens:
- Client browser request secure pages (https) from a Server (usually web server)
- Server sends its Public key through a certificate which is usually called SSL certificate. As we already know, it has been digitally signed by a third party (CA).
- Client will check if the SSL certificate is valid (means check if the Public key really belongs to the web server). How? Client browser must already have all Major CAs’ public key to be able to verify the digital certificate.
- After validation, client creates a Symmetric Key and will encrypt it with Web server public key and will send it to the server.
- At the last stage server will decrypt the receiving packet with its own private key and will have the same symmetric key and now both side can communicating using same key.
Now the target here is to use Proxy server in the middle and decrypt the https traffics for controlling purposes. What happens here is as follow:
Instead of Client browser seeing the server’s certificate, Proxy server dynamically generates a certificate for the server and signs it with its own root certificate (the Proxy server CA Certificate). Proxy server receives the server’s certificate, while Client browser receives Proxy server’s certificate. Therefore it is needed that client browser has the Proxy server CA certificate in the list of trusted certificates otherwise client see a security warning indicating that the root authority is not trusted. The communication is SSL (encrypted) from Client web browser to Proxy server and also SSL (encrypted) from Proxy server to the web server.
Note: The HTTPS proxy uses the root certificates and private key files that you upload to the appliance to decrypt traffic. The root certificate and private key files you upload to the appliance must be in PEM format; DER format is not supported.
You can choose how to handle the root certificates issued by the wsa:
- Inform users to accept the root certificate. You can inform the users in your organization what the new policies are at the company and tell them to accept the root certificate supplied by the organization as a trusted source.
- Add the root certificate to client machines. You can add the root certificate to all client machines on the network as a trusted root certificate authority. This way, the client applications automatically accept transactions with the root certificate.
Now let’s come back to the WSA concepts. Here we can create decryption policies to handle HTTPS traffic in the following ways:
- Pass through encrypted traffic. The appliance passes through the connection between the client and the server without inspecting the traffic content. However, with a standard pass-through policy, the WSA does check the validity of the requested server by initiating an HTTPS handshake with the server. This validity check includes server certificate validation. If the server fails the check, the transaction is blocked.
- Decrypt traffic and apply the content-based access policies defined for HTTP traffic. This also makes malware scanning possible. The appliance allows the connection, but inspects the traffic content. It decrypts the traffic and applies Access Policies to the decrypted traffic as if it were a plaintext HTTP connection. By decrypting the connection and applying Access Policies, you can scan the traffic for malware.
- Drop the HTTPS connection
- Monitor the request (take no final action) as the web proxy continues to evaluate the request against policies that may lead to a final drop, pass through, or decrypt action.
Two steps is needed to control https traffics:
First step: Enabling the https Proxy
Security services -> https proxy
Here we need to first enable the https proxy. When you enable the HTTPS Proxy, you must configure what the appliance uses for a root certificate when it sends self-signed server certificates to the client applications on the network. You can upload a root certificate and key that your organization already has, or you can configure the appliance to generate a certificate and key with information you enter.
Once the HTTPS Proxy is enabled, all HTTPS policy decisions are handled by Decryption Policies. When the HTTPS proxy is enabled, HTTPS-specific rules in access policies are disabled and the web proxy processes decrypted HTTPS traffic using rules for HTTP. It means that if the action “Default Action” in Decryption Policies is “Decrypt”, then It decrypts the traffic and applies Access Policies to the decrypted traffic as if it were a plaintext HTTP Connection.
Second step: Controlling https traffics
Web security manager -> Decryption Policies
The control settings of the Decryption Policy group determine whether the appliance decrypts, drops, or passes through the connection:
URL Categories: You can configure the action to take on HTTPS requests for each predefined and custom URL category. Click the link under the URL Filtering column for the policy group you want to configure.
Note: If you want to block (with end-user notification) a particular URL category for HTTPS requests instead of drop (with no end-user notification), choose to decrypt that URL category in the Decryption Policy group and then choose to block the same URL category in the Access Policy group.
Web Reputation: You can configure the action to take on HTTPS requests based on the web reputation score of the requested server. Click the link under the Web Reputation column for the policy group you want to configure.
Default Action: You can configure the action the appliance should take when none of the other settings apply. Click the link under the Default Action column for the policy group you want to configure.
Note: The configured default action only affects the transaction when no decision is made based on URL category or Web Reputation score. If Web Reputation filtering is disabled, the default action applies to all transactions that match a Monitor action in a URL category. If Web Reputation filtering is enabled, the default action is used only if the Monitor action is selected for sites with no score.
10. Anti-Malware System
It uses and combines following two defense system and techniques:
- Web reputation filter as the first layer of defense.
- Signature-based verdict engines which uses combination of proprietary Cisco technology with multiple antivirus engines including Sophos, Webroot and McAfee as the second layer of defense.
The proprietary Cisco technology is Cisco powerful dynamic vectoring and streaming (DVS) engine which employs rapid object parsing and vectoring techniques, along with stream scanning, early exit algorithms, and reputation-based caching. This results in an unparalleled increase in scanning throughput over existing first-generation Internet Content Adaptation Protocol (ICAP)-based solutions.
The DVS engine might determine multiple malware verdicts for a single URL. Multiple verdicts can come from one or both enabled scanning engines:
- Different verdicts from different scanning engines. When you enable both Webroot and either Sophos or McAfee, each scanning engine might return different malware verdicts for the same object. When a URL causes multiple verdicts from both enabled scanning engines, the appliance performs the most restrictive action. For example, if one scanning engine returns a block verdict and the other a monitor verdict, the DVS engine always blocks the request.
- Different verdicts from the same scanning engine. A scanning engine might return multiple verdicts for a single object when the object contains multiple infections. When a URL causes multiple verdicts from the same scanning engine, the appliance takes action according to the verdict with the highest priority. The following text lists the possible malware scanning verdicts from the highest to the lowest priority.
- Virus
- Trojan Downloader
- Trojan Horse
- Trojan Phisher
- Hijacker
- System monitor
- Commercial System Monitor
- Dialer
- Worm
- Browser Helper Object
- Phishing URL
- Adware
- Encrypted file
- Unscannable
- Other Malware
Policies for Scanning Outbound Traffic
Web security manager -> Outbound Malware scanning
To prevent malicious data from leaving the network, the Web Security appliance provides the Outbound Malware Scanning feature. Using policy groups, you can define:
- which uploads are scanned for malware
- which anti-malware scanning engines to use for scanning
- which malware types to block.
Outbound Malware Scanning Policies define whether or not the Web Proxy blocks HTTP requests and decrypted HTTPS connections for transactions that upload data to a server (upload requests). An upload request is an HTTP or decrypted HTTPS request that has content in the request body.
When the Web Proxy receives an upload request, it compares the request to the Outbound Malware Scanning policy groups to determine which policy group to apply. After it assigns the request to a policy group, it compares the request to the policy group’s configured control settings to determine whether to block the request or monitor the request. When an Outbound Malware Scanning Policy determines to monitor a request, it is evaluated against the Access Policies, and the final action the Web Proxy takes on the request is determined by the applicable Access Policy.
Each upload request is assigned to an Outbound Malware Scanning Policy group and inherits the control settings of that policy group. After the Web Proxy receives the upload request headers(usually POST header), it has the information necessary to decide if it should scan the request body. The DVS engine scans the request and returns a verdict to the Web Proxy. The block page appears to the end user, if applicable.
11. Application Visibility and Control (AVC)
The Application Visibility and Control (AVC) engine lets you create policies to control application activity on the network without having to fully understand the underlying technology of each application. You can configure application control settings in Access Policy groups. You can block or allow applications individually or according to application type. You can also apply controls to particular application types.
AsyncOS periodically queries the update servers for new updates to all security service components, including the AVC engine. AVC engine updates can include support for new application types and applications, as well as updated support for existing applications if any application behaviors change. By updating the AVC engine between AsyncOS version updates, the Web Security appliance remains flexible without requiring a server upgrade.
AsyncOS for Web assigns the following default actions for the Global Access Policy:
- New Application Types default to Monitor.
- New application behaviors, such as block file transfer within a particular application; defaults to Monitor.
- New applications for an existing application type default to the Application Type’s default.
Related configurations are as following:
- in web security manager -> Access Policies
In the “application” column we configure some settings for different applications.
- Web Security Manager > Overall Bandwidth Limits
12. Prevent Loss of Sensitive Data
The Web Security appliance secures your data by providing the following capabilities:
- Cisco Data Security filters: The Cisco Data Security filters on the Web Security appliance evaluate data leaving the network over HTTP, HTTPS and FTP. It can be configured from: Security Services > Data Transfer Filters
- Third-party data loss prevention (DLP) integration: The Web Security appliance integrates with leading third party content-aware DLP systems that identify and protect sensitive data. The Web Proxy uses the Internet Content Adaptation Protocol (ICAP) which allows proxy servers to offload content scanning to external systems. It can be configured from: Network > External DLP Servers.
When the Web Proxy receives an upload request, it compares the request to the Data Security and External DLP Policy groups to determine which policy group to apply. If both types of policies are configured, it compares the request to Cisco Data Security policies before external DLP policies. After it assigns the request to a policy group, it compares the request to the policy group’s configured control settings to determine what to do with the request. How you configure the appliance to handle upload requests depends on the policy group type.
When an upload request matches an External DLP Policy, the Web Proxy sends the upload request to the DLP system using the Internet Content Adaptation Protocol (ICAP) for scanning. The DLP system scans the request body content and returns a block or allow verdict to the Web Proxy. The allow verdict is similar to the Allow action for Cisco Data Security policies in that the upload request will be compared to the Access Policies. The final action the Web Proxy takes on the request is determined by the applicable Access Policy.
13. Monitor System Activity Through Logs
The two main log files types typically used by administrators are:
- Access log. This records all Web Proxy filtering and scanning activity.
- Traffic Monitor log. This records all Layer-4 Traffic Monitor activity.
